Install Alma 9 MCC
Hardware specs
Installation guide
Download Alma 9 boot ISO and flash it into a USB drive.
Insert the USB Drive in the server and boot from the USB.
Select the GUI installation method.
Select time zone.
Select keyboard layout.
Software selection: Gnome Desktop.
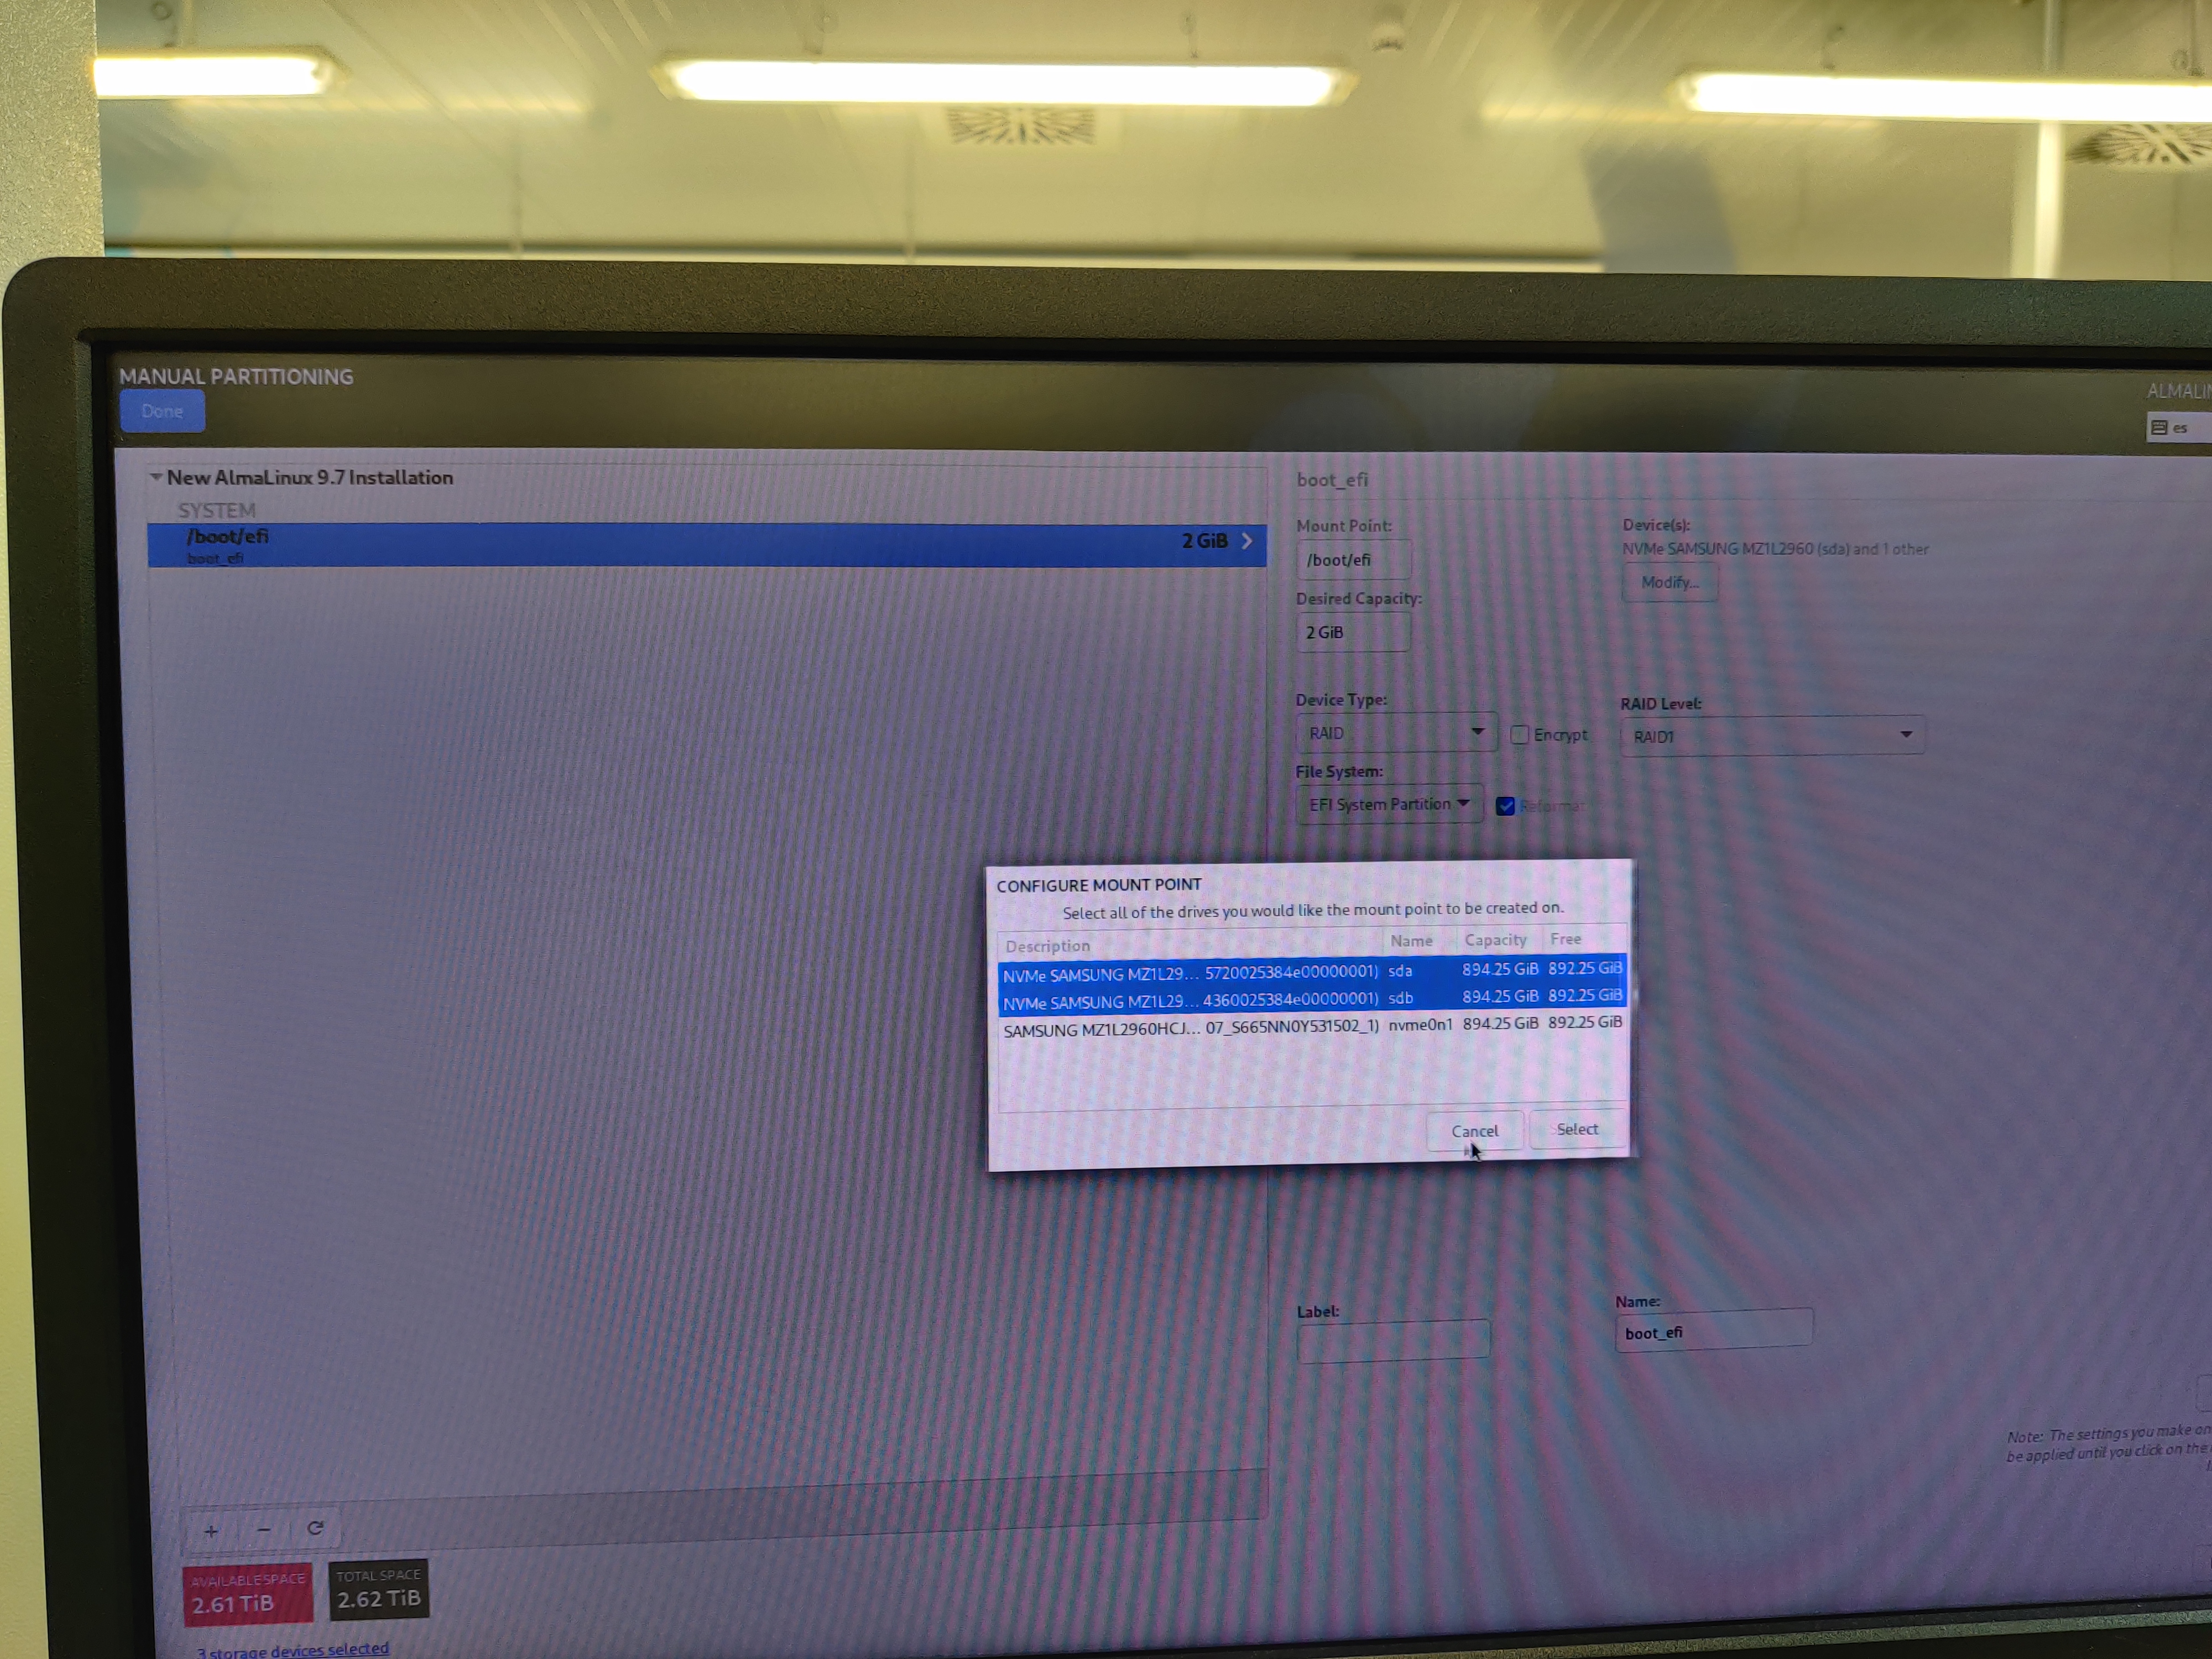
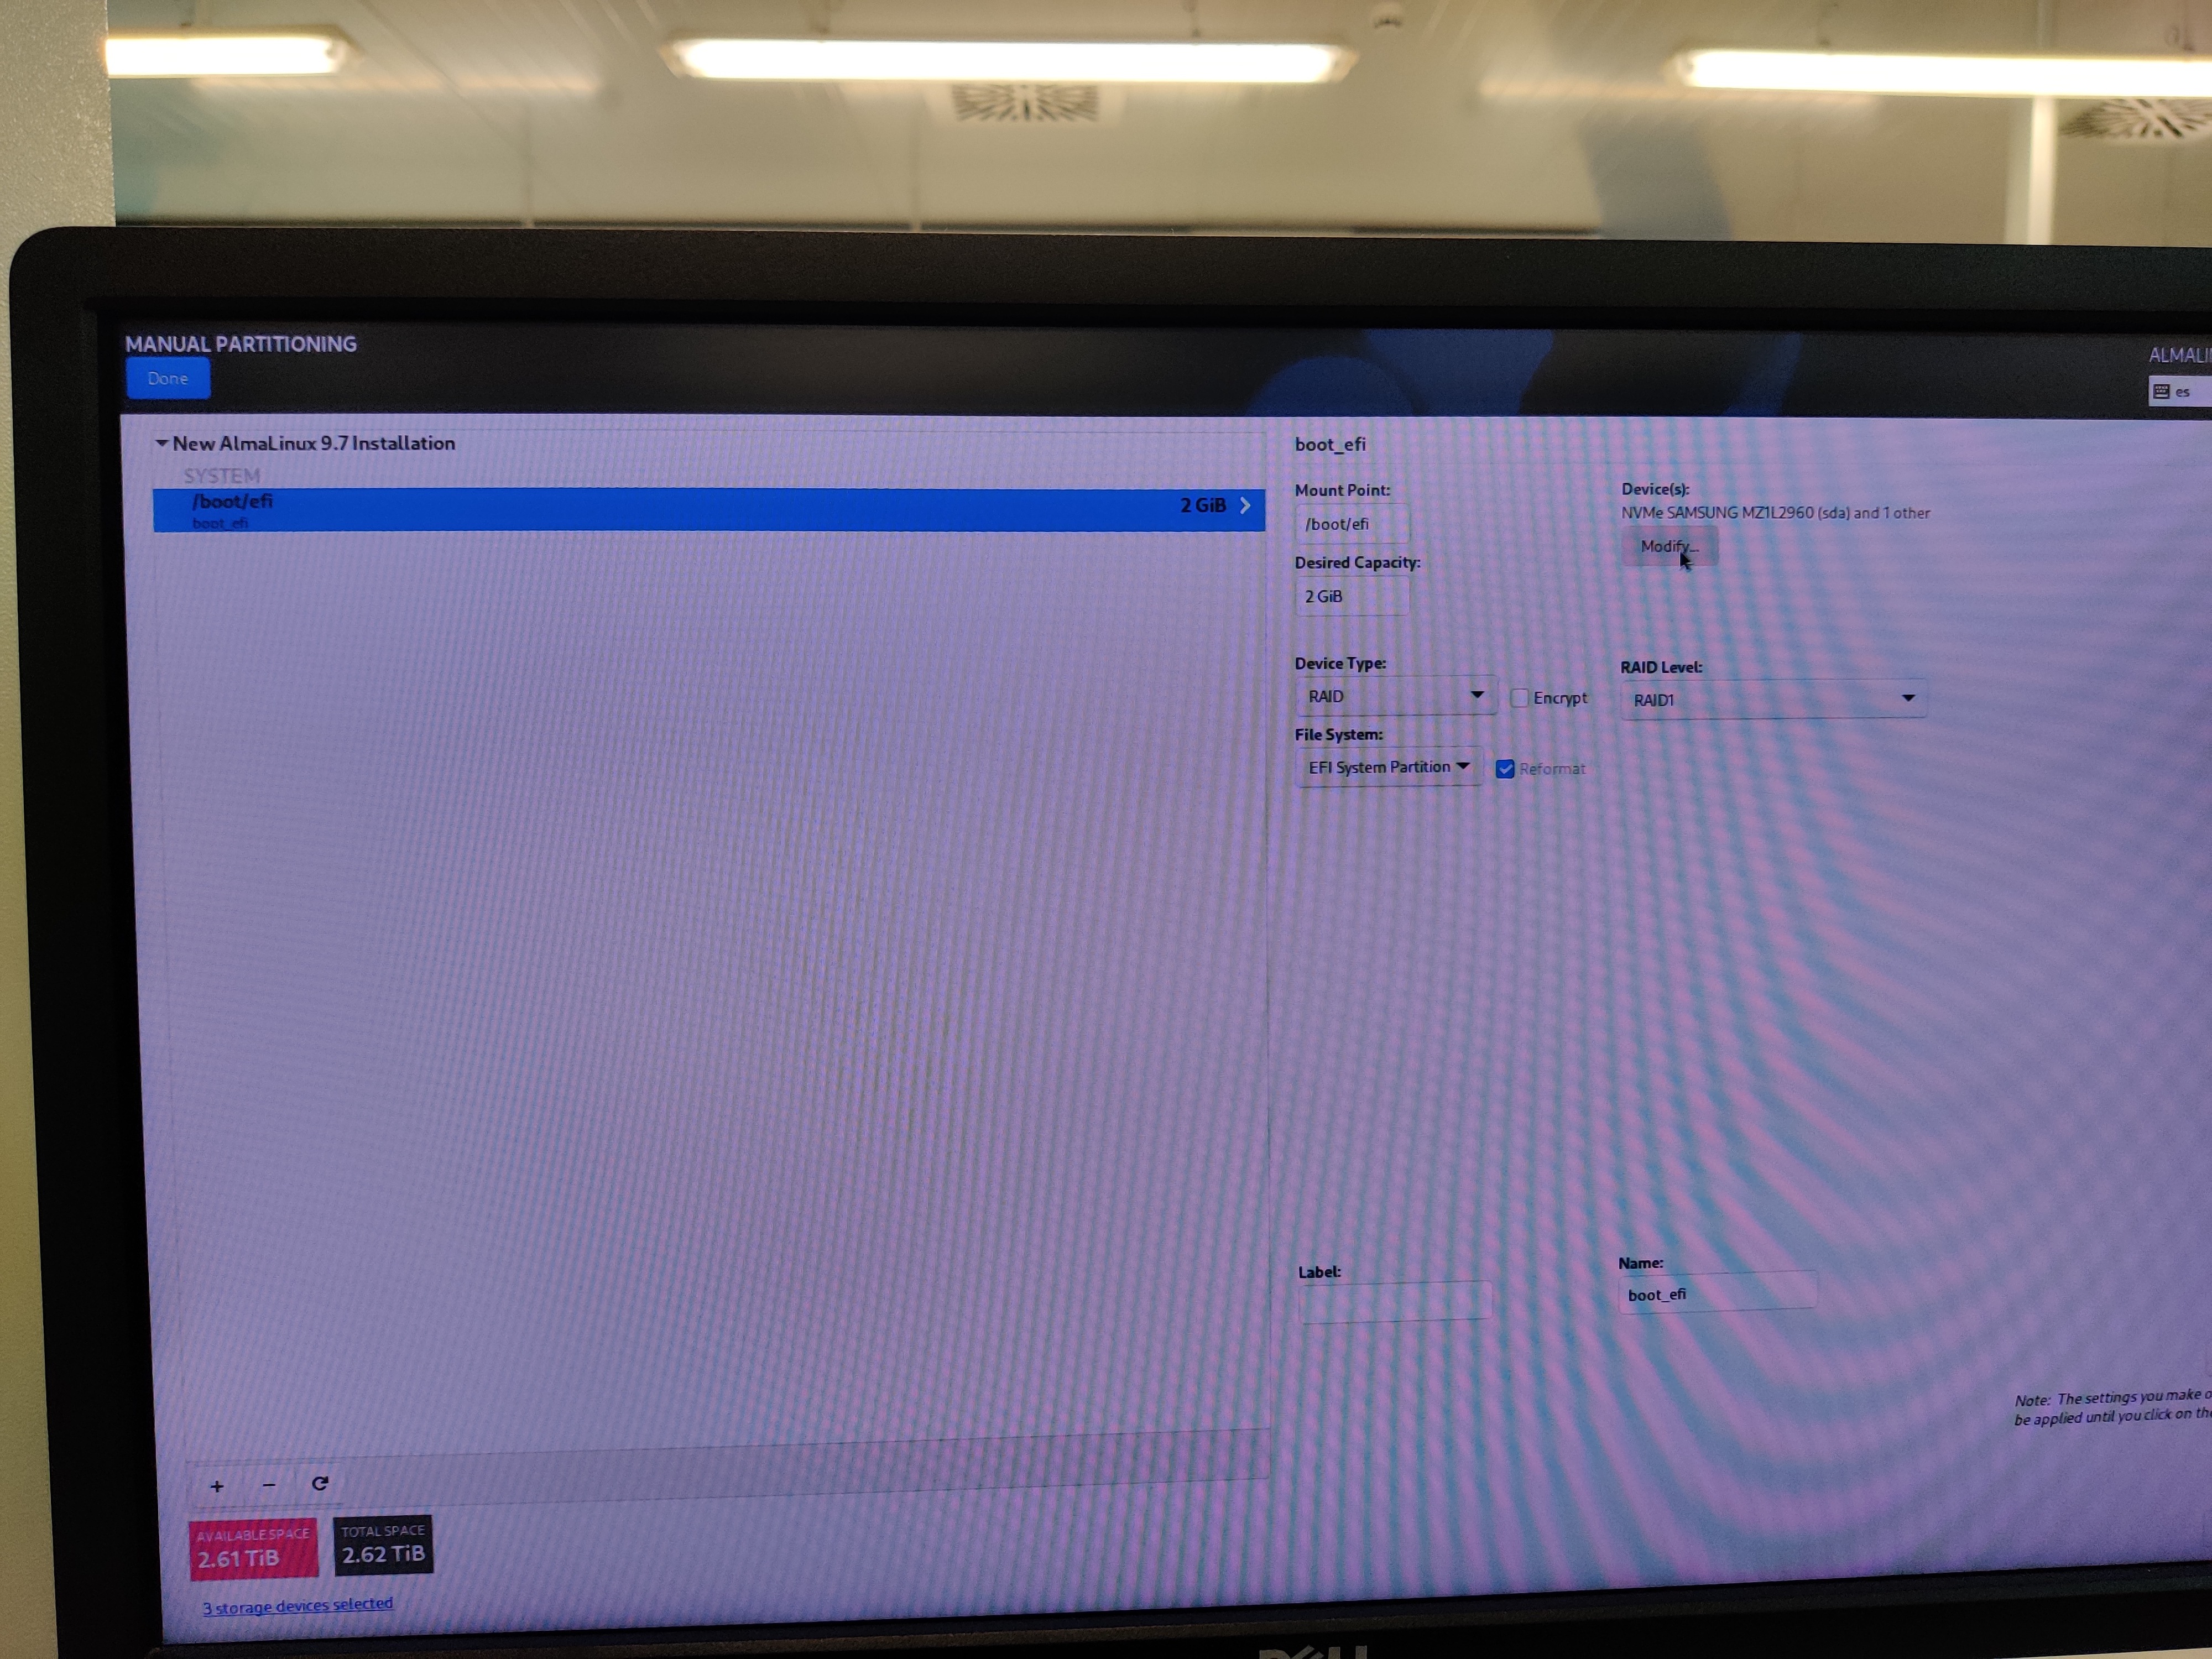
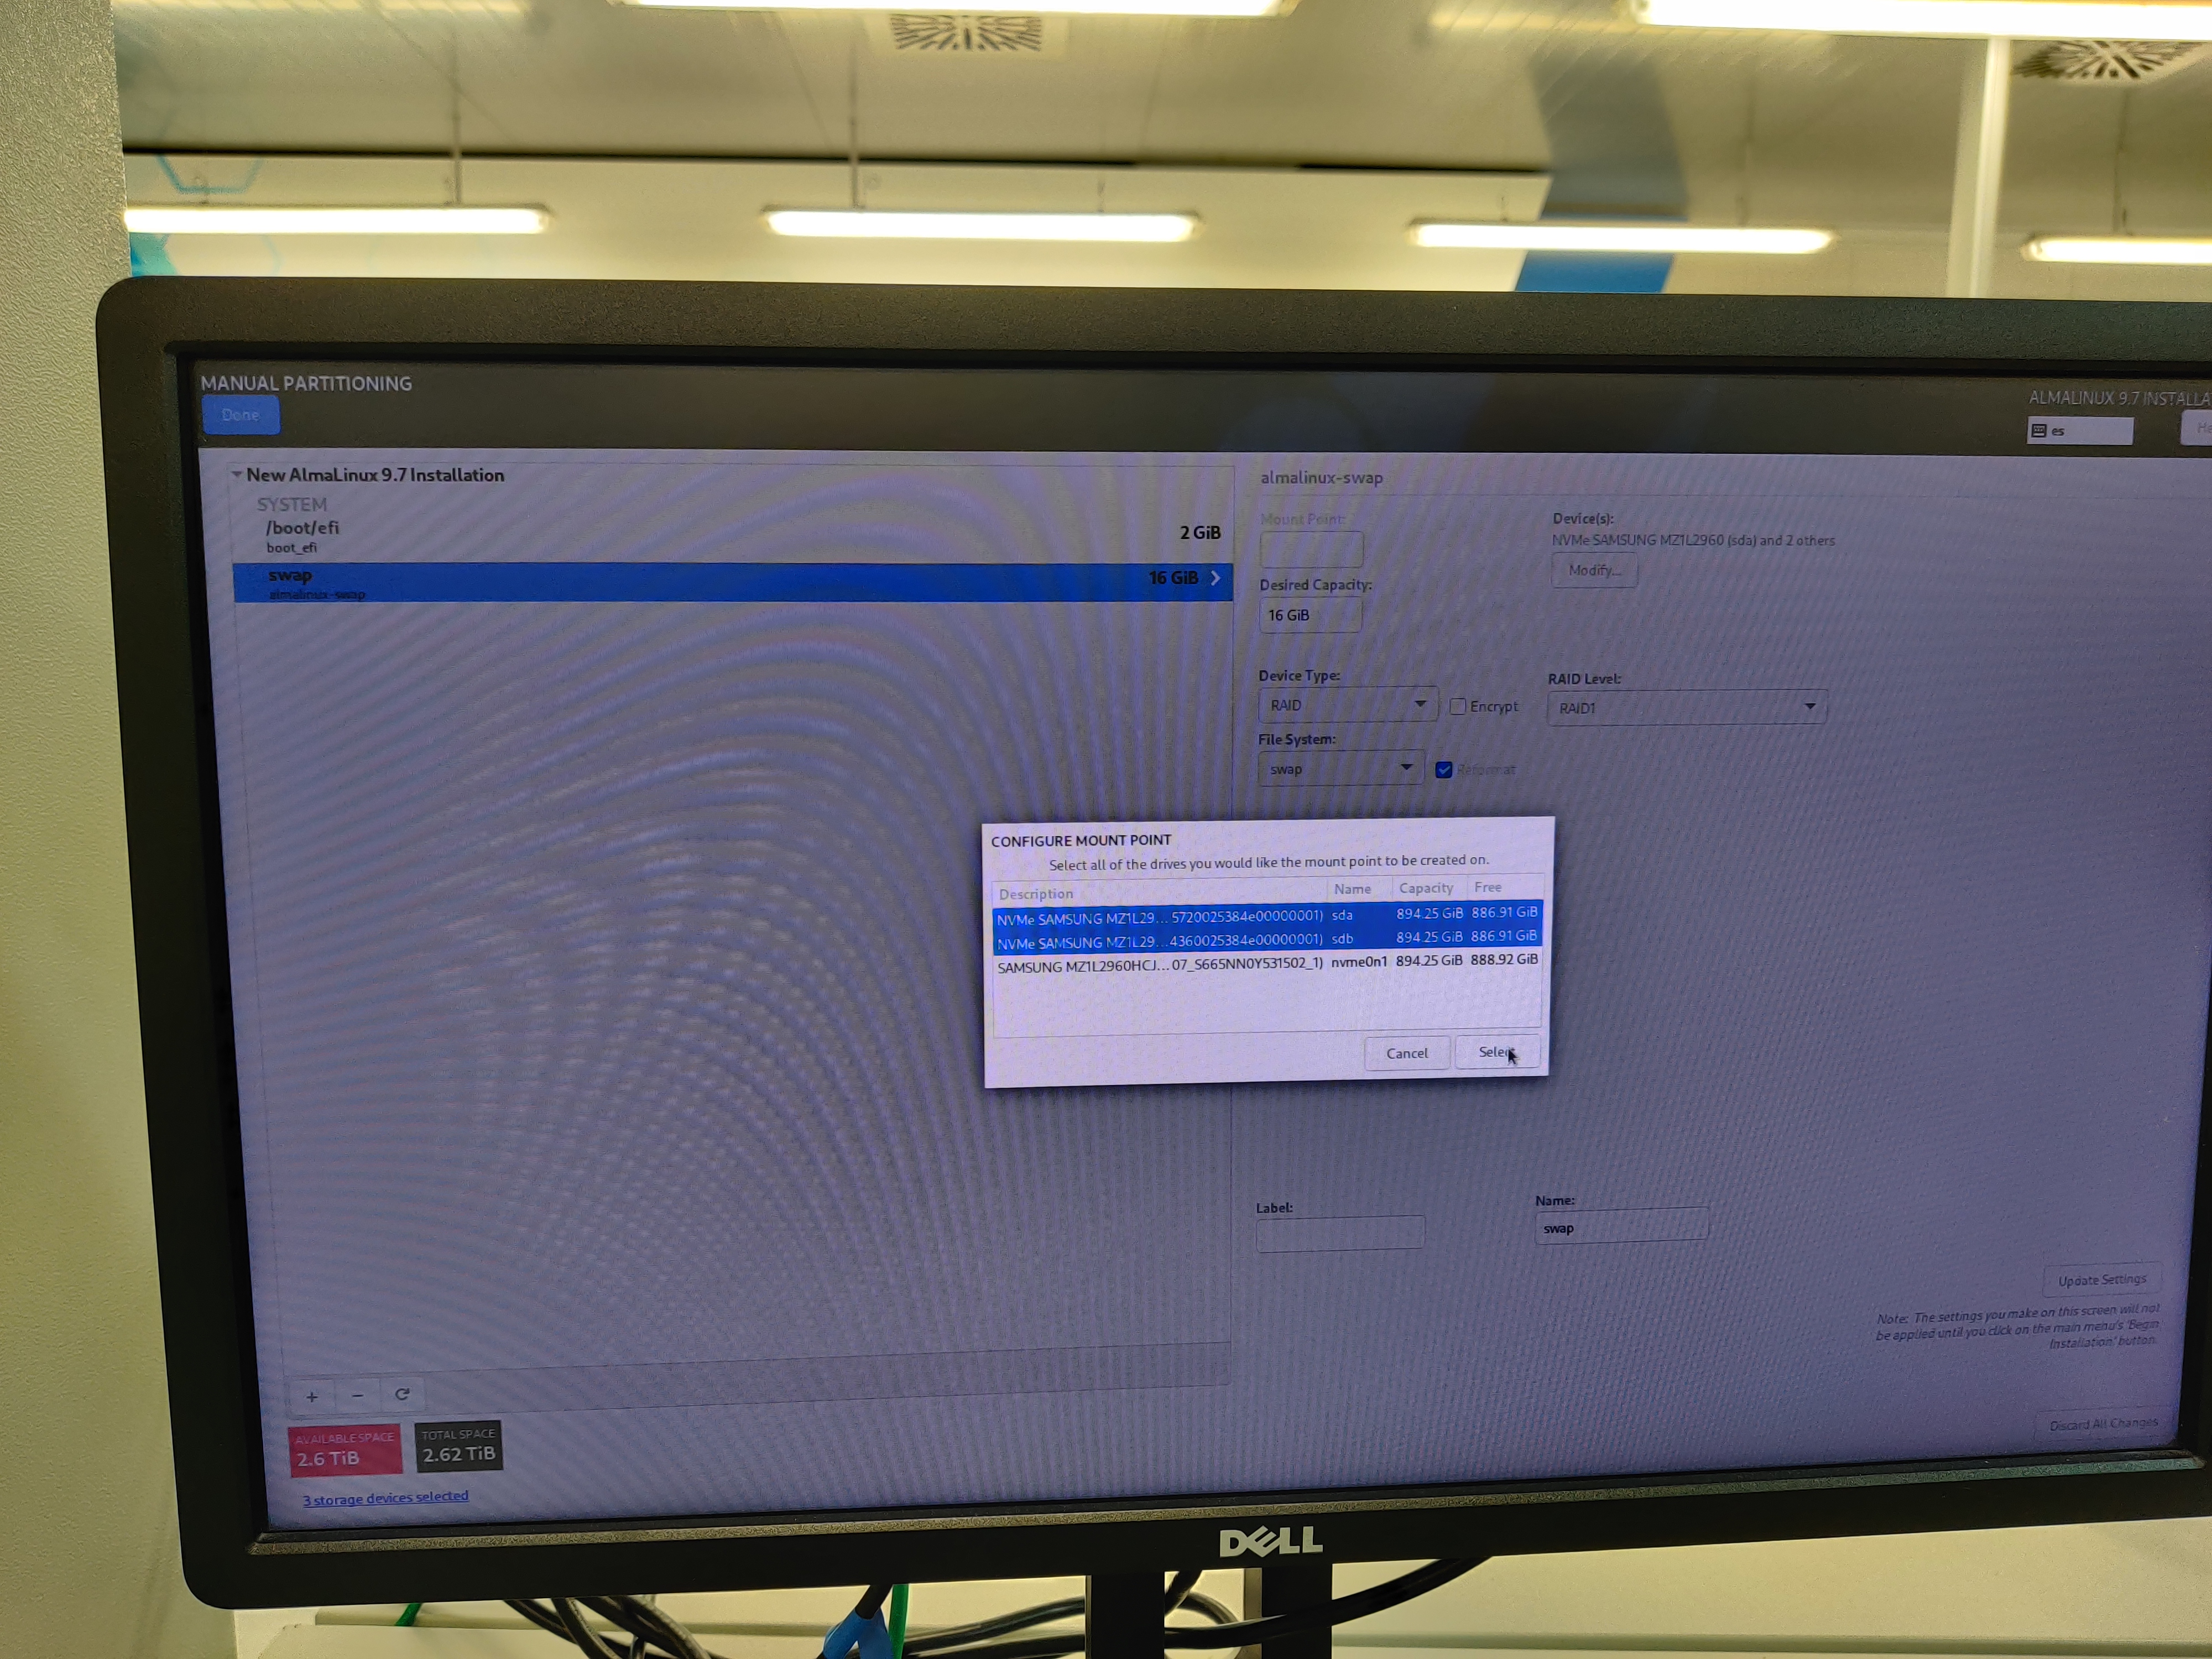
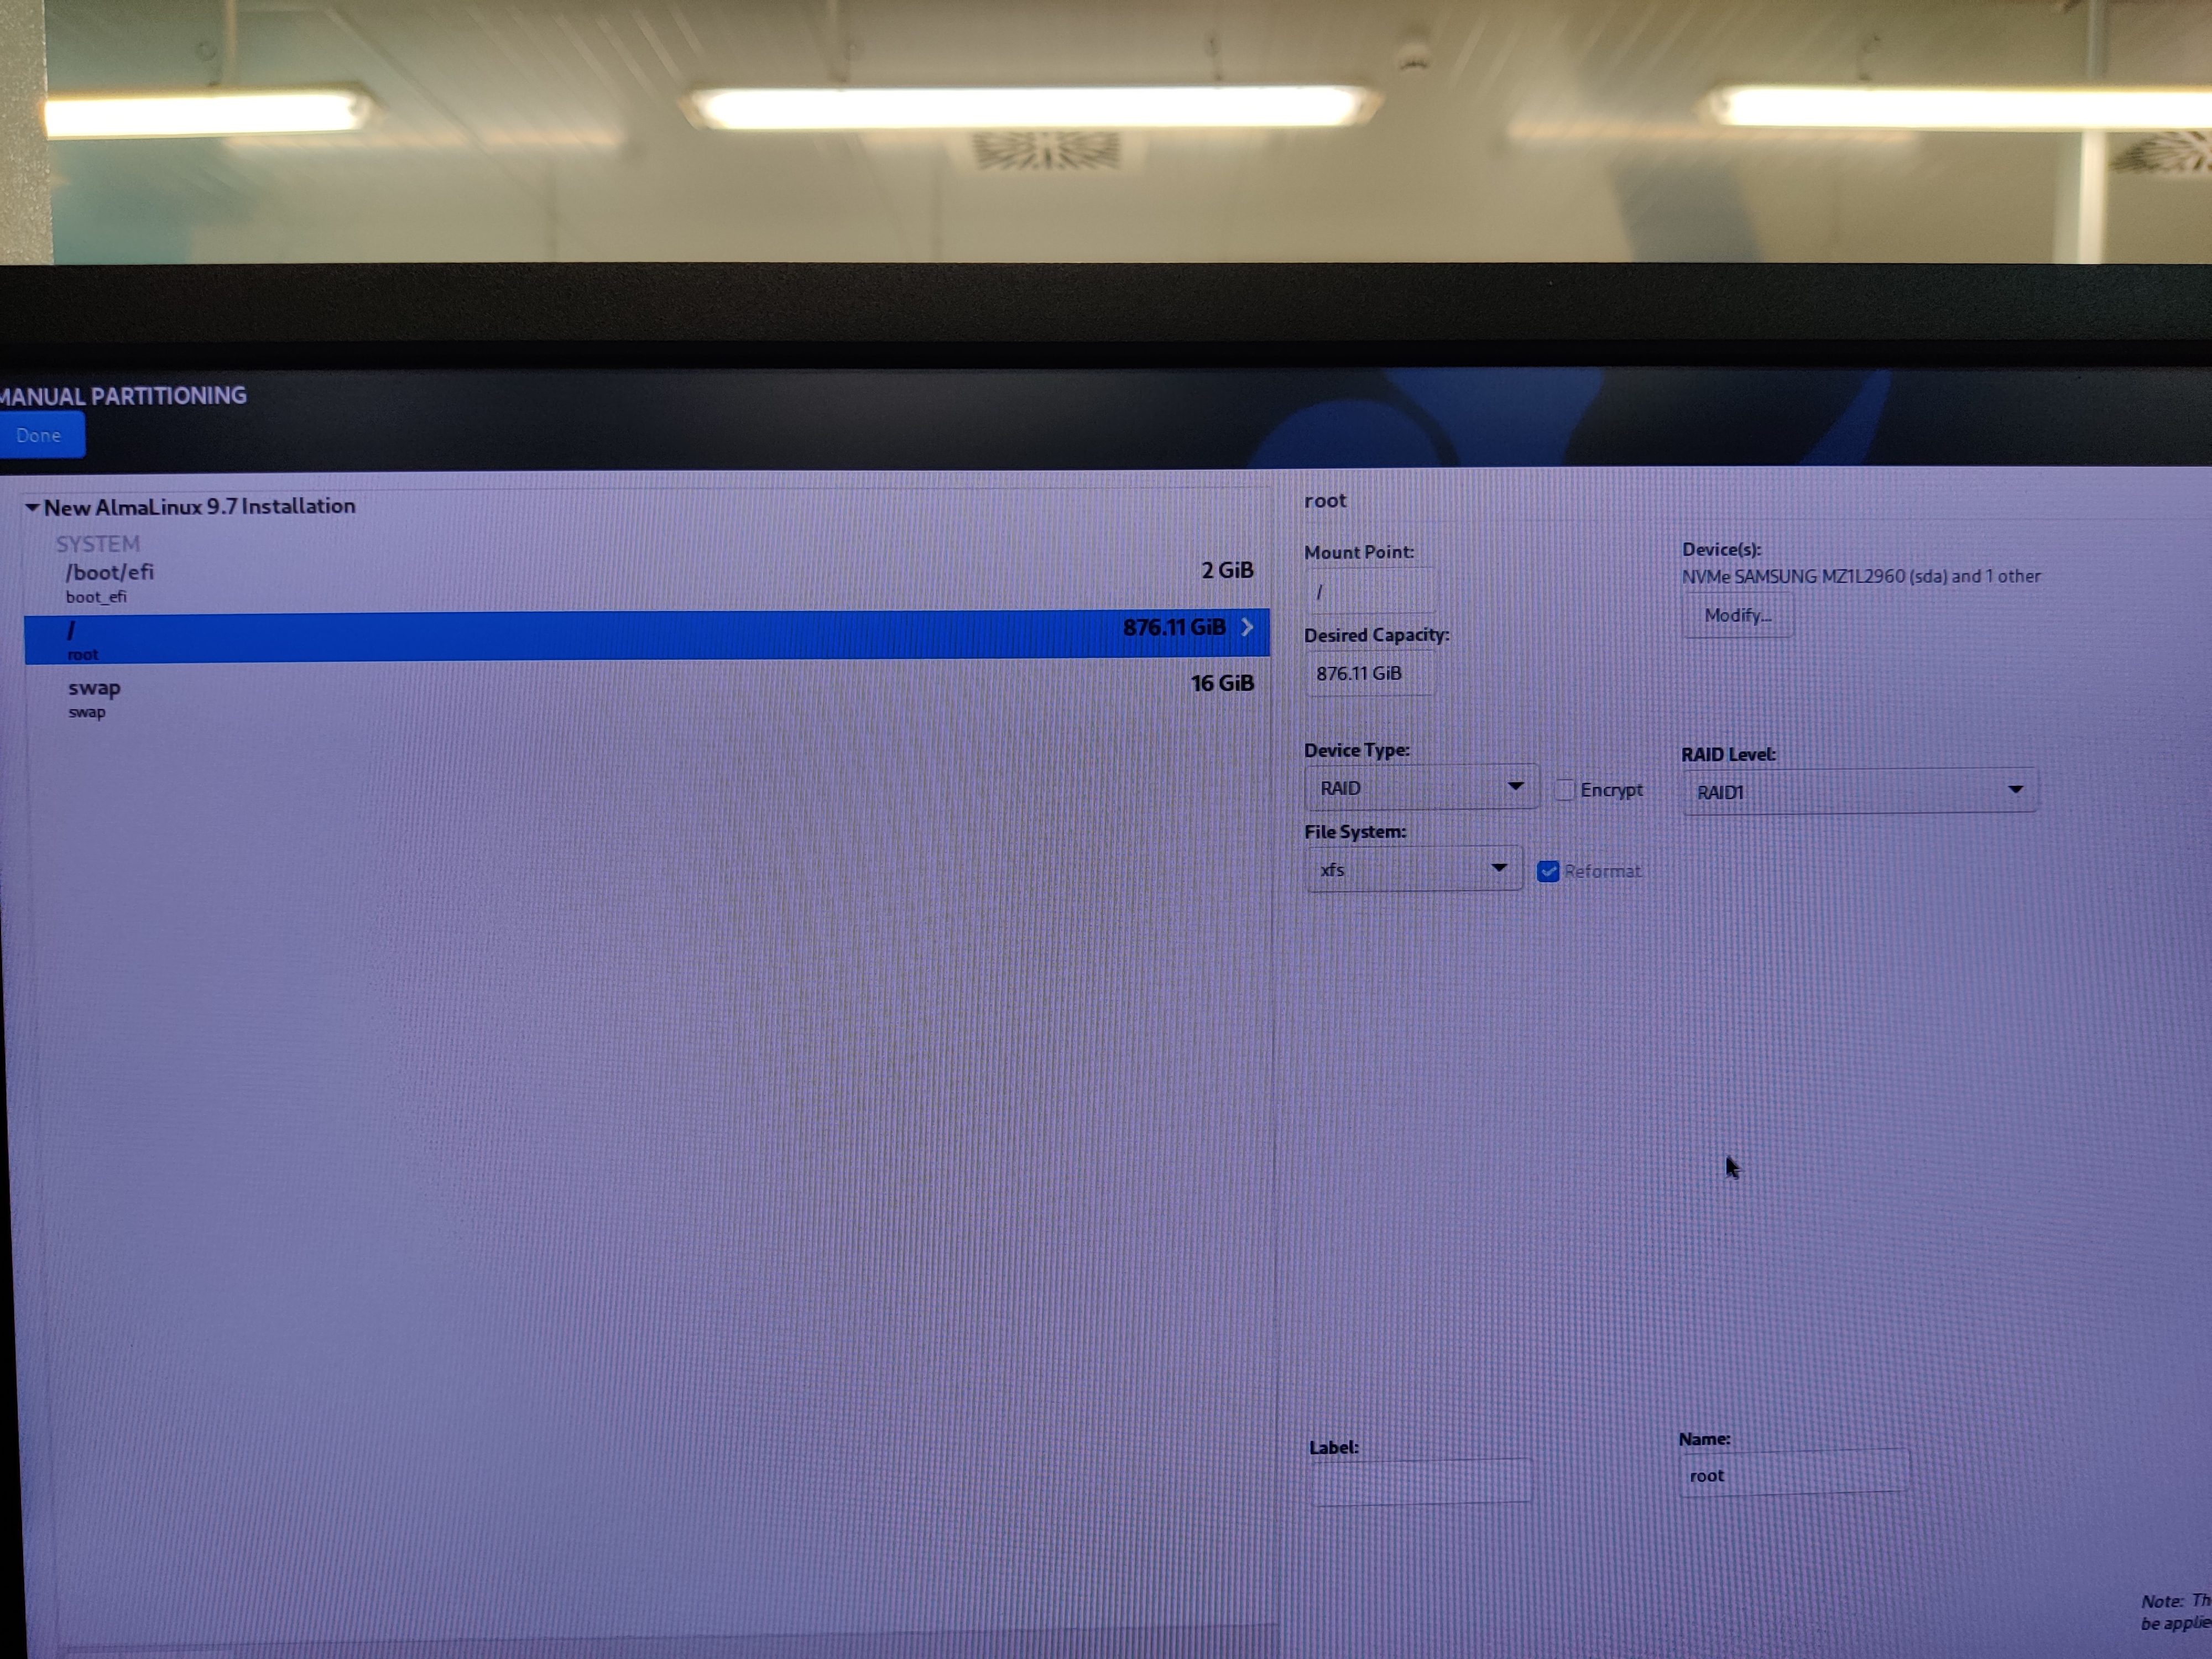
Disk partitioning
Select the 3 available drives.
Configure manual disk partitioning and partition the disks as follows:
Configure the network as needed.
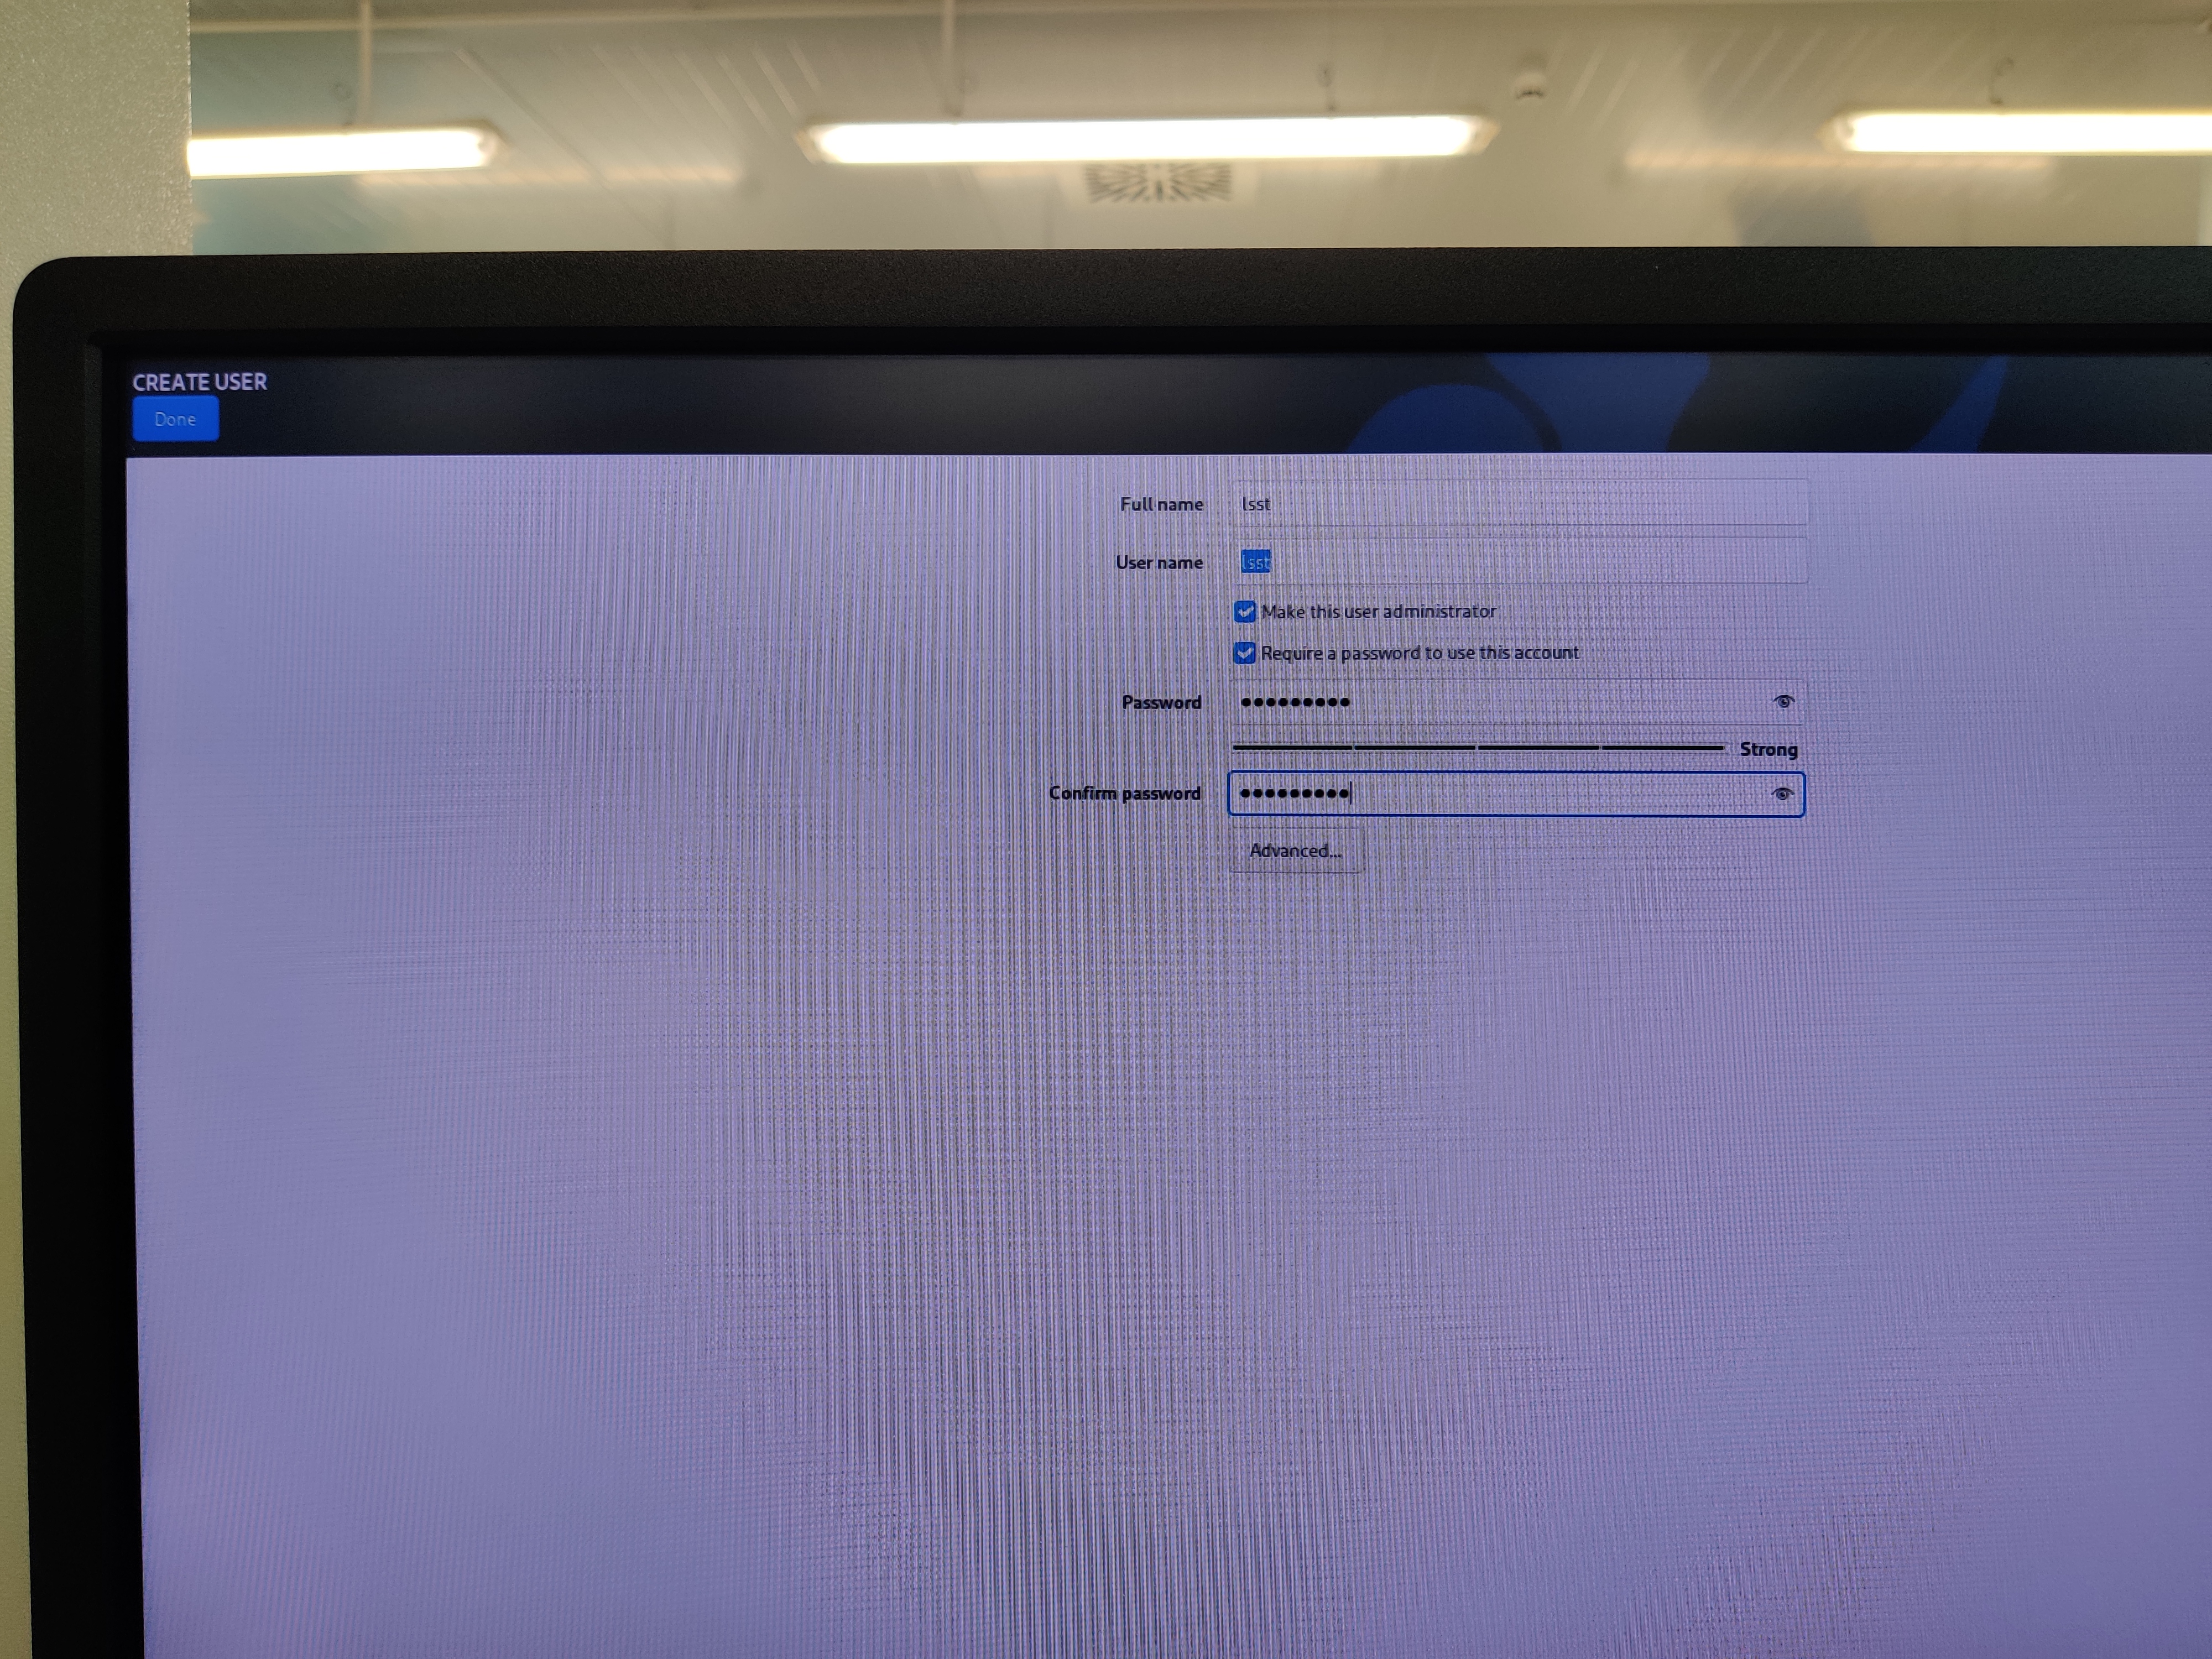
Lock root user:

Create lsst user:
Name: lsst.
Set a password.
Select make this user admin.
Begin installation.
Installation complete.
Check that the partitions are okay.
Execute:
lsblk
The result should look like the following:
NAME        MAJ:MIN RM   SIZE RO TYPE  MOUNTPOINTS
sda           8:0    0 894.3G  0 disk
├─sda1        8:1    0    16G  0 part
│ └─md127     9:127  0    16G  0 raid1 [SWAP]
├─sda2        8:2    0     2G  0 part
│ └─md125     9:125  0     2G  0 raid1 /boot/efi
└─sda3        8:3    0 876.2G  0 part
  └─md126     9:126  0 876.1G  0 raid1 /
sdb           8:16   0 894.3G  0 disk
├─sdb1        8:17   0    16G  0 part
│ └─md127     9:127  0    16G  0 raid1 [SWAP]
├─sdb2        8:18   0     2G  0 part
│ └─md125     9:125  0     2G  0 raid1 /boot/efi
└─sdb3        8:19   0 876.2G  0 part
  └─md126     9:126  0 876.1G  0 raid1 /
nvme0n1     259:0    0 894.3G  0 disk
Create telemetry saving directory
Create a partition in the disk for the telemetry.
Open gdisk tool ->
sudo gdisk /dev/nvme0n1If the drive has no partition table, create one ->
oadd a new partition ->
nleave everything to default by pressing ENTER multiple times
write table to disk and exit ->
wexit the gdisk tool ->
q
Format the created partition to
ext4->sudo mkfs.ext4 /dev/nvme0n1p1Get the uuid for the partition ->
ls -l /dev/disk/by-uuid/Add the partition to fstab
sudo vim /etc/fstabAdd this line to the existing file to mount the partition at boot:
UUID=5664642c-9418-4ae9-a6db-8d68ec392807 /mnt/telemetry ext4 defaults 0 0Save and close the file
Create telemetry folder ->
sudo mkdir /mnt/telemetryReload daemon ->
sudo systemctl daemon-reloadMount the folder ->
sudo mount /mnt/telemetry/Change ownership for the telemetry folder ->
sudo chown -R lsst:lsst /mnt/telemetry/Reboot the system to check that changes are applied.
Check the drives ->
lsblkNAME MAJ:MIN RM SIZE RO TYPE MOUNTPOINTS sda 8:0 0 894.3G 0 disk ├─sda1 8:1 0 16G 0 part │ └─md127 9:127 0 16G 0 raid1 [SWAP] ├─sda2 8:2 0 2G 0 part │ └─md125 9:125 0 2G 0 raid1 /boot/efi └─sda3 8:3 0 876.2G 0 part └─md126 9:126 0 876.1G 0 raid1 / sdb 8:16 0 894.3G 0 disk ├─sdb1 8:17 0 16G 0 part │ └─md127 9:127 0 16G 0 raid1 [SWAP] ├─sdb2 8:18 0 2G 0 part │ └─md125 9:125 0 2G 0 raid1 /boot/efi └─sdb3 8:19 0 876.2G 0 part └─md126 9:126 0 876.1G 0 raid1 / nvme0n1 259:0 0 894.3G 0 disk └─nvme0n1p1 259:1 0 894.3G 0 part /mnt/telemetry
Add motd
Include some identifying text into the /etc/motd file, for example:
███    ███  ██████  ██████      █████  ██      ███    ███  █████       █████
████  ████ ██      ██          ██   ██ ██      ████  ████ ██   ██     ██   ██
██ ████ ██ ██      ██          ███████ ██      ██ ████ ██ ███████      ██████
██  ██  ██ ██      ██          ██   ██ ██      ██  ██  ██ ██   ██          ██
██      ██  ██████  ██████     ██   ██ ███████ ██      ██ ██   ██      █████
                                                                  by TEKNIKER
Add wallpaper
Copy the
EdificioTekniker_logo_negativo.pngto/home/lsst/PicturesOpen the settings and set the wallpaper to the Tekniker one
Install useful tools
sudo yum install git git-lfs tracerouteAdd lazygit
Add lazygit repo ->
sudo dnf copr enable atim/lazygitsudo yum install lazygit
Add btop, bat
Add epel repo ->
sudo dnf install epel-releasesudo dnf install btop bat
Enable cockpit
sudo systemctl enable --now cockpit.socketThis is a web interface for managing the hardware
For example change the power settings to performance
Change the time zone to UTC
Add oh-my-posh
curl -s https://ohmyposh.dev/install.sh | bash -sAdd these lines to the
.bashrcfile:alias la="ls -la" alias lh="ls -lh" eval "$(oh-my-posh init bash --config 'https://raw.githubusercontent.com/julen-garcia/oh-my-posh-themes/refs/heads/main/amro_customized.omp.json')"
Install docker
Add repo ->
sudo dnf config-manager --add-repo=https://download.docker.com/linux/centos/docker-ce.reposudo dnf -y install docker-ce --nobestEnable docker ->
sudo systemctl enable --now dockerCheck docker OK ->
systemctl status dockerCreate docker group if not created already ->
sudo groupadd dockerAdd your user to the docker group ->
sudo usermod -aG docker $USERLog out and log back in so that your group membership is re-evaluated.
Configure Docker to start on boot with systemd
sudo systemctl enable docker.service
sudo systemctl enable containerd.service
Install the MtMount Operation Manager
Follow the steps defined at the README of this repository.
Create a folder for the
docker-compose.ymlfile ->mkdir -p /home/lsst/LSST/mtmount-operation-manager-dockerDownload the docker-compose file from the repo and place it in the folder.
Log into the github docker repo.
Launch the docker compose ->
docker compose up -d
Open ports for HHD communication
For sending and receiving data from/to the HHD some tcp ports must be opened. To do so follow these steps:
Execute this command to open the right ports:
sudo firewall-cmd --zone=public --add-port=50006/tcp --permanent --zone=public --add-port=40005/tcp --permanent --zone=public --add-port=50005/tcp --permanent --zone=public --add-port=40006/tcp --permanent --zone=public --add-port=7500/tcp --permanent --zone=public --add-port=3306/tcp --permanent --zone=public --add-port=3015/tcp --permanent --zone=public --add-port=50013/tcp --permanent --zone=public --add-port=50015/tcp --permanent --zone=public --add-port=50035/tcp --permanent --zone=public --add-port=50016/tcp --permanent --zone=public --add-port=50017/tcp --permanent --zone=public --add-port=30005/tcp --permanent --zone=public --add-port=319/udp --permanent --zone=public --add-port=320/udp --permanent
Reload the firewall:
sudo firewall-cmd --reload
Check that the ports are opened:
$ sudo firewall-cmd --list-all

public (active)

target: default

icmp-block-inversion: no

interfaces: enp0s25 enp4s0 enp5s0

sources:

services: dhcpv6-client ssh

ports: 50006/tcp 40005/tcp 50005/tcp 40006/tcp 7500/tcp 3306/tcp 3015/tcp 50013/tcp 50015/tcp 50035/tcp 319/udp 320/udp 50016/tcp 50017/tcp 30005/tcp

protocols:

masquerade: no

forward-ports:

source-ports:

icmp-blocks:

rich rules:
Time sync
Check that
chronyis installed ->chronyc trackingUpdate the configuration to the Rubin one, for this update
/etc/chrony.conffile as follows:
# Use public servers from the pool.ntp.org project.
# Please consider joining the pool (http://www.pool.ntp.org/join.html).
server time1.cp.lsst.org iburst
server ntp.cp.lsst.org iburst
server 1.cl.pool.ntp.org iburst
server 1.south-america.pool.ntp.org iburst
server ntp.cp.lsst.org iburst

# Record the rate at which the system clock gains/losses time.
driftfile /var/lib/chrony/drift

# Allow the system clock to be stepped in the first three updates
# if its offset is larger than 1 second.
makestep 1.0 3

# Enable kernel synchronization of the real-time clock (RTC).
rtcsync

# Enable hardware timestamping on all interfaces that support it.
#hwtimestamp *

# Increase the minimum number of selectable sources required to adjust
# the system clock.
#minsources 2

# Allow NTP client access from local network.
allow 192.168

# Serve time even if not synchronized to a time source.
#local stratum 10

# Specify file containing keys for NTP authentication.
#keyfile /etc/chrony.keys

# Specify directory for log files.
logdir /var/log/chrony

# Select which information is logged.
#log measurements statistics tracking

leapsecmode system
maxslewrate 1000
smoothtime 400 0.001 leaponly
leapsectz right/UTC
Restart
chronyd->sudo systemctl restart chronydCheck status
$ sudo systemctl status chronyd
● chronyd.service - NTP client/server
     Loaded: loaded (/usr/lib/systemd/system/chronyd.service; enabled; preset: enabled)
     Active: active (running) since Tue 2026-06-02 09:20:22 UTC; 45s ago
       Docs: man:chronyd(8)
             man:chrony.conf(5)
    Process: 255532 ExecStart=/usr/sbin/chronyd $OPTIONS (code=exited, status=0/SUCCESS)
   Main PID: 255534 (chronyd)
      Tasks: 1 (limit: 196649)
     Memory: 1.0M (peak: 2.1M)
        CPU: 25ms
     CGroup: /system.slice/chronyd.service
             └─255534 /usr/sbin/chronyd -F 2

Jun 02 09:20:22 tma-mcc systemd[1]: Starting NTP client/server...
Jun 02 09:20:22 tma-mcc chronyd[255534]: chronyd version 4.8 starting (+CMDMON +REFCLOCK +RTC +PRIVDROP +SCFILTER +SIGND +NTS +SECHASH +IPV6 +DEBUG)
Jun 02 09:20:22 tma-mcc chronyd[255534]: Using right/UTC timezone to obtain leap second data
Jun 02 09:20:22 tma-mcc chronyd[255534]: Frequency 52.305 +/- 0.006 ppm read from /var/lib/chrony/drift
Jun 02 09:20:22 tma-mcc chronyd[255534]: Loaded seccomp filter (level 2)
Jun 02 09:20:22 tma-mcc systemd[1]: Started NTP client/server.
Jun 02 09:20:27 tma-mcc chronyd[255534]: Selected source 139.229.160.38 (time1.cp.lsst.org)
Jun 02 09:20:27 tma-mcc chronyd[255534]: Activated time smoothing (leap seconds only)
Jun 02 09:20:27 tma-mcc chronyd[255534]: System clock TAI offset set to 37 seconds

$ chronyc tracking
Reference ID    : 8BE5A026 (time1.cp.lsst.org)
Stratum         : 2
Ref time (UTC)  : Tue Jun 02 09:21:32 2026
System time     : 0.000135883 seconds fast of NTP time
Last offset     : +0.000143650 seconds
RMS offset      : 0.000143650 seconds
Frequency       : 52.305 ppm fast
Residual freq   : +1.894 ppm
Skew            : 0.007 ppm
Root delay      : 0.000448531 seconds
Root dispersion : 0.000522120 seconds
Update interval : 64.3 seconds
Leap status     : Normal
Install database
Clone the repository to
/home/lsst/LSST
cd /home/lsst/LSST

git clone git@github.com:lsst-ts/ts_tma_mariadb-docker.git
Rename repository folder:
mv ts_tma_mariadb-docker/ mariadb-docker
Go to
/home/lsst/LSST/mariadb-docker->cd /home/lsst/LSST/mariadb-dockerStart the docker service:
docker compose up -d
Change ownership of the backup folder ->
sudo chown lsst:lsst backup/Get the last backup database available and copy it to:
./backupCopy the three files:
lsst_AppData-XXX.sql.gz
lsst_events-XXX.sql.gz
lsst_settings-XXX.sql.gz
Create database
sudo ./createdatabases.pl
Restore last backup database. The script will choose the most recent backup.
sudo ./restoredatabases.pl
Edit contrab file to execute the python code that generates the backups:
crontab -e
Add the following lines (Note: that the paths may change for each specific installation.):
5 12 * * * /home/lsst/LSST/mariadb-docker/createbackup.pl

5 13 * * * docker run --rm -v /home/lsst/LSST/mariadb-docker/python:/script -v /home/lsst/LSST/mariadb-docker/backup:/backup python:3.7 python /script/main.py
It is possible that some
perlcommands are missing, install them as follows:$ sudo dnf install perl-File-Copy -y # test that is working $ perl -e "use File::Copy; print 'ok'" ok
Save and exit crontab editor.
Create folder for github backup
Go to
LSSTfolder ->cd /home/lsst/LSSTClone Backup in github repo ->
git clone https://github.com/lsst-ts/ts_llconfig_mtcs.gitCreate ssh credentials and add them to the backup-mt-git user, credentials for this user are in the TMA vault.
If the folder naming is kept the same as in this guide, the script will backup the changes automatically
Install LV 2024
Download LabVIEW 2024 Q3 64bit pro installer for linux.
Install the rhel9 version ->
sudo dnf install ./ni-labview-2024-pro-24.3.5.49154-0+f2-rhel9.noarch.rpmInstall the appbuild and core packages ->
sudo dnf install ni-labview-2024-appbuild-24.3.5.49154-0+f2.x86_64 ni-labview-2024-core-24.3.5.49154-0+f2.x86_64
Install VIPM
First, download your copy of VIPM for Linux at: VIPM if you haven’t.
Unzipping the VIPM ZIP file
create the installation directory ->
sudo mkdir -p /usr/local/JKI/VIPM/unzip the files ->
sudo unzip vipm-22.1.2354-linux.zip -d /usr/local/JKI/VIPM
Enable VI server in the LabVIEW installation.
Run VIPM from the Terminal ->
sudo /usr/local/JKI/VIPM/vipmDownload the latest VIPM configuration from this link here
Note that the file is big and is uploaded using git-lfs
Execute VI Package Manager.
Verify that VI Package Manager can connect to LabVIEW. If not:
Open LabView and change the LabVIEW configuration, going to Tools/options/VI Server and active the TCP/IP port and ensure that the port corresponds with the port at the VI Package Manager.
On the VI Package Manager, got to Tools->Options->LabView
Install the configuration file downloaded from github repo.
Add libraries
Add libGetClocks.so
There are two options for doing this:
If LV 2024 and the tekniker packages are installed
Create soft link to the
*.sothat gets the TAI time:sudo ln -s /usr/local/natinst/LabVIEW-2024-64/vi.lib/Tekniker/getClocksLabview/getclockssharedobject/libGetClocks.so /usr/local/lib/libGetClocks.so
If there is no LV installation in the server
Download the
libGetClocks.sofrom here and place it in/usr/local/lib/
Install EUI
Download the latest rpm (rpm name tma_eui) from LSST nexus repo.
Install the rpm ->
sudo dnf install ./tma_eui-7.1.0-1.el9.x86_64.rpm
Install VNC
Install VNC server
sudo dnf install tigervnc-server
Set a password for the user
vncpasswd
Copy the template for the Systemd service
sudo cp /lib/systemd/system/vncserver@.service /etc/systemd/system/vncserver@:1.service
Edit the configuration for the VNC to set the vnc user, in this case
lsst.sudo vim /etc/tigervnc/vncserver.users
The result should look like this:
$ sudo cat /etc/tigervnc/vncserver.users
# TigerVNC User assignment
#
# This file assigns users to specific VNC display numbers.
# The syntax is <display>=<username>. E.g.:
#
# :2=andrew
# :3=lisa
:1=lsst
Edit the configuration for the VNC to set the vnc screen resolution, in this case
1920x1080.sudo vim /etc/tigervnc/vncserver-config-defaults
The result should look like this:
$ sudo cat /etc/tigervnc/vncserver-config-defaults
## Default settings for VNC servers started by the vncserver service
#
# Any settings given here will override the builtin defaults, but can
# also be overriden by ~/.vnc/config and vncserver-config-mandatory.
#
# See HOWTO.md and the following manpages for more details:
#     vncsession(8) Xvnc(1)
#
# Several common settings are shown below. Uncomment and modify to your
# liking.

# session=gnome
# securitytypes=vncauth,tlsvnc
geometry=1920x1080
# localhost
# alwaysshared

# Default to GNOME session
# Note: change this only when you know what are you doing
session=gnome
Enable and launch the service
sudo systemctl daemon-reload

sudo systemctl start vncserver@:1

sudo systemctl status vncserver@:1

sudo systemctl enable vncserver@:1
Create telemetry folders
For telemetry and log storing create the following folders:
/mnt/telemetry/AlarmHistory/mnt/telemetry/ErrorHistory/mnt/telemetry/MemoryLogging
Remove old log files from the telemetry directory
Download the
main.pyscript from this repoMake 4 copies, name and modify them as follows :
removeOldAlarmFiles.py: in this copy replace the global variables as shown below:
files_directory = "/mnt/telemetry/AlarmHistory"
date_search_pattern = 'Alarm_File_(\d\d\d\d)_(\d\d)_(\d\d)'
months_to_keep = 12
removeOldErrorFiles.py: in this copy replace the global variables as shown below:
files_directory = "/mnt/telemetry/ErrorHistory"
date_search_pattern = 'SoftwareErrorFile_(\d\d\d\d)_(\d\d)_(\d\d)'
months_to_keep = 12
removeOldMemoryLoggingFiles.py: in this copy replace the global variables as shown below:
files_directory = "/mnt/telemetry/MemoryLogging"
date_search_pattern = 'MemoryLogging_(\d\d\d\d)_(\d\d)_(\d\d)'
months_to_keep = 2
removeOldWindowNavigationFiles.py: in this copy replace the global variables as shown below:
files_directory = "/mnt/telemetry/MemoryLogging"
date_search_pattern = 'WindowNavigationLogging_(\d\d\d\d)_(\d\d)_(\d\d)'
months_to_keep = 4
Call this 4 scripts from crontab
Edit crontab for the default user
crontab -eAdd the following lines:
35 9 * * * python3 /mnt/telemetry/AlarmHistory/removeOldAlarmFiles.py
40 9 * * * python3 /mnt/telemetry/ErrorHistory/removeOldErrorFiles.py
45 9 * * * python3 /mnt/telemetry/MemoryLogging/removeOldMemoryLoggingFiles.py
50 9 * * * python3 /mnt/telemetry/MemoryLogging/removeOldWindowNavigationFiles.py
Note that in this case the 4 scripts are placed in different places, for this crontab task to work the scripts must be placed there or the path to them must be changed when editing the crontab task
Install HeadReferenceOffsetCalculationTool and UserManagementTool
Build the tools from the EUI repo in the LSST_HMIs.lvproj
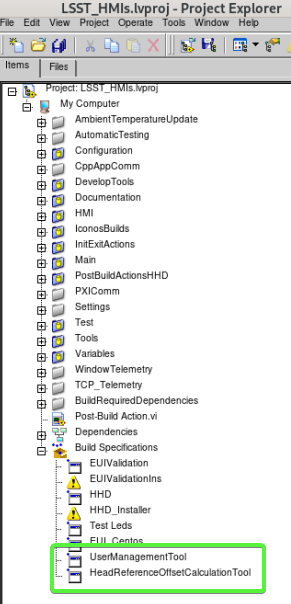
HeadReferenceOffsetCalculationTool:
Copy the build to
/usr/local/TMA_HeadReferenceOffsetCalculationTool
UserManagementTool:
Copy the build to
/usr/local/TMA_UserManagementTool
Install SettingsDatabaseEditor
Build the tool from this repo
Copy the build to
/usr/local/TMA_SettingsDatabaseEditor
Create shortcut for AUI in the Desktop
Enable desktop icons ->
gnome-extensions enable desktop-icons@gnome-shell-extensions.gcampax.github.comCreate symbolink link to the EUI
cd to the Desktop ->
cd /home/lsst/DesktopCreate symbolink link in the desktop pointing to the installed EUI ->
ln -s /usr/local/TMA/eui tma_eui