How-To’s & Credentials#
General How-To’s and credentials that are needed to interact with the TMA software.
Accessing La Serena PDM Server#
Obtain credentials to the La Serena PDM Server by filing an IHS ticket under the Base Facility ownership.
Download OpenVPN and enter the IP address
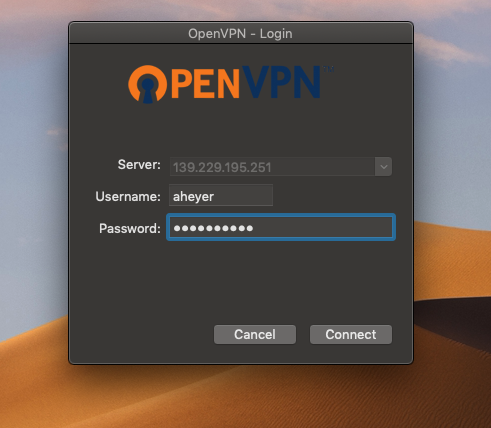
139.229.195.251. Connect to this IP. Or download the configuration file provided by IT when given access to the Summit VPN.
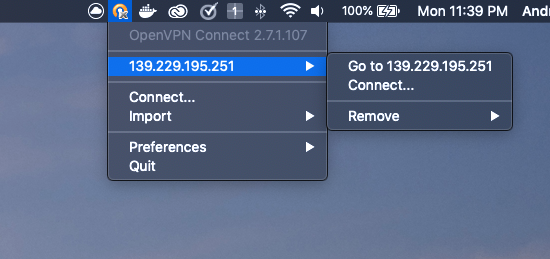
Enter the credential given to you by IT
Connect to the server using the mac finder

Now in your finder window you will have access to the TSS-Share folder.
Accessing Nexus Repo#
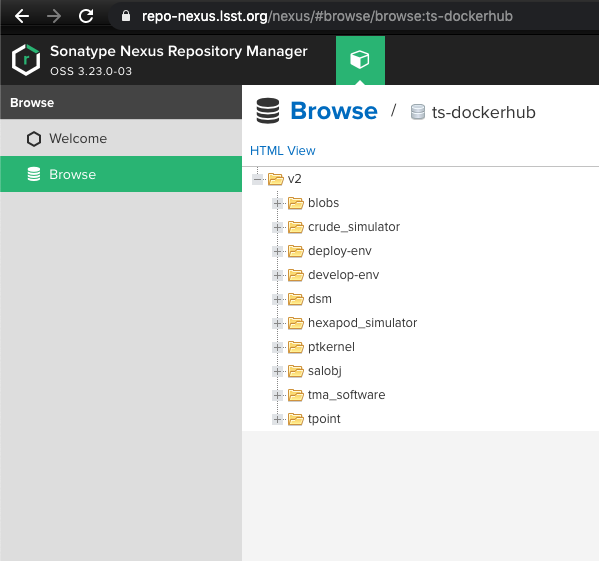
Acquire credentials to the nexus server by asking IT for credentials. You can verify your credentials by visiting https://repo-nexus.lsst.org/nexus/#browse/welcome and logging in.
In a terminal window do
docker login ts-dockerhub.lsst.org, use the credentials from step #1, not your regular docker credentials which may differ.You should now be able to pull any of the repositories from the
ts-dockerhubfolder within https://repo-nexus.lsst.org/nexus/#browse/welcome. The one that this documentation is concerned with istma_software
HMI Login#
- Username:
MUser
- Password:
1234
MCC Login#
- Username:
MUser
- Password:
Tekniker2020
CCW Aux PC Login#
- Username:
lsst
- Password:
Tekniker2015
Finding your IP & Subnet#
Here are methods for finding your subnet depending on the OS your are on. The Subnet is the first 3 sets of numbers of your IP. For example if your computer Y has an IP address of 172.17.0.1 then the subnet that this IP address is in, is 172.17.0. Loosely speaking, if you want to have another machine X pingable by your computer Y then machine X would need to be in the same subnet. In other words machine X would need to have an IP address of 172.17.0.*, where the asterisk can be anything between 0-255 AND is not already taken. In this case computer Y already occupies IP address 172.17.0.1 and so a safe IP we can assign machine X could be 172.17.0.20. For more information consult an IT professional as this information is likely to not be perfect and some details omitted.
MacOSX#
Open System Preferences -> Network
For each network interface that you are using, select it in the list on the left to view the network address. On my computer Ethernet is 10.0.1.9 and Wi-Fi is 10.0.1.24
Another option is to run the ifconfig command in Terminal, but there are a lot of them, so it can be confusing. en0 is probably wired and en1 is probably wifi.
CentOS7#
Open a terminal
type
ip addr showLook for
wlan0oreth0interface.
Windows 10#
Type “Network” into the search bar
Click the result that says “Network settings”
Click “Details” underneath the wireless network info
Open a terminal
Type
ifconfigLook wlan or eth interface
Manually setting an IP address#
Manually setting the IP address of a machine is common practice when quickly setting up a network of computers together. When you manually set an IP address of a machine with the intention of enabling it to talk to another machine you need to be sure of two things. The first is you need to be sure that the IP of the two machines are on the same subnet. The second is that no two machines on the same subnet can occupy the same IP. Here are a few steps to help you manually configure the IP address depending on the OS of that machine.
Windows 10#
Start by opening the Control Panel. Search for “Control Panel” in the bottom left corner search bar.
Select “Network and Internet”
Select “Network and Sharing Center”
Select “Change adapter settings”
Double click the adapter you wish to manually set the IP address for. Generally, the first adapter is for the VM to communicated to ethernet. Any adapters after that are for connecting to other hardware. In the case of this documentation, the second adapter is the one we want to manually set the adapter for.
Select “Properties”, accept any dialogues boxes that ask you if you want to make changes.
Double click “Internet Protocol Version 4 (TCP/IPv4)”
You can now set you IP address. In the case of this documentation regardless of what you are setting your IP address to the Subnet mask needs to be
255.255.255.0and the Default gateway empty. There is also no need to make changes to the DNS settings.
Creating Host-Only adapter#
Creating a host only adapter within Virtualbox is necessary when you want to have the virtual machine communicating to other machines other than the host. This is because by default Virtualbox creates 1 network adapter that is only used to talking to the host machine and generally the one that is used for internet. You should never change the first adapter as this could break your virtual machine indefinitely.
Configure X11 Server#
These instructions are particularly tailored for using an x11 server with Docker, which is where for the TMA Software it is needed.
CentOS 7#
Run the command
IP=$(ifconfig em1 | grep inet | awk '$1=="inet" {print $2}'). You may need to change “em1” to be “eno” or whichever your primary network name is. You can find out what it is by runningifconfig.Run the command
xhost + $IPRun Docker using the following arguments
docker run -it --net=host --env="DISPLAY" --volume="/tmp/.X11-unix:/tmp/.X11-unix" [your docker container]Now if you run a program that opens up a window, such as
labview64you should see a windows appear.
MacOS#
Install Xquartz, https://www.xquartz.org/
Run Docker using the following arguments
docker run -it -e DISPLAY=$IP:0 -v /tmp/.x11-unix:/tmp/.x11-unix -v /Users/aheyer/gitdir/:/home/saluser/gitdir andrewheyer/tma_software:develop
Change HHD IP Address#
Locate the XML file HMIConfig.xml in the last /configuration directory of the software directory and then search for hhd and look for --hhd-ip option and change the address there.
Then restart the EUI.