11. Virtual Machines
Virtual Machines were created to speed the process of TMA Software deployment. It enables a developer to interact with the TMA software on their personal work machine, usualy with limited functionality. Here you can find the different TMA Software containers that are available along with detailed instructions on how to deploy them.
11.1. Windows10
The Windows 10 Virtual Machine is required by the MCC to run the EUI. This is because the EUI must first connect to the NSV’s before allowing any user logins. This Virtual Machine is also able to run a variety of simulators.
11.1.1. Pre-requisites
- Install Vagrant
- Install VirtualBox
- Complete the steps for Accessing La Serena PDM Server
11.1.2. NSV Simulator
The NSV Simulator is required to be able to run the EUI. This is a useful simulator when you wish to verify that the EUI is installed and is able to communicate to the NSV’s
- Download the package.box from 139.229.195.251/TSS-Share/TMA/package.box. You will need to have an OpenVPN account made for you from IT to have access to this shared drive.
- Do git clone https://github.com/lsst-ts/ts_Vagrantfiles.git
- cd path/to/ts_Vagrantfiles/mtmount
- Move the package.box file into /path/to/ts_Vagrantfile/mtmount
- Do vagrant up
- When asked “Which interface should the network bridge to?” select 1
- Login into the Windows Virtualmachine. The pw is vagrant
- Once inside the Windows10 Virtual Machine open the NI Distributed System Manager. There should be an icon for the program on the Desktop.
- If you do not see the image below restart the machine, for a reason I do not know the VM has mal booted preventing NSV’s from becoming available.
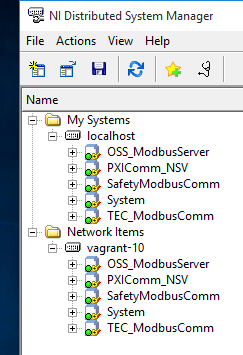
- Double click the program ATSSimulatorsAndTools/SimulateTelemetry/SimulateTelemetry.exe this program is writing random values to the NSV’s.
- Open the NI Distributed System Manager. Expand one of the items under localhost. You should see these values changing at random. We have now demonstrated that the NSV simulator is functioning properly. We verify the values are indeed deployed and being changed via the NI Distributed System Manger.
11.2. CentOS
A CentOS container is capable of dupliating the Mount Control Computer (MCC). The MCC can run the Engineering User Interface (EUI) which allows controlling of the telescope. The MCC is also the first interact with the Software Abstraction Layer (SAL). Here we will go through the process of deploying a CentOS Docker container.
11.2.1. Pre-requisites
Most of the TMA Software is LabVIEW. LabVIEW is a window intensive software and as a result requires that you install some method for viewing windows from your Docker container.
- Install Docker
- Install an X Windows Server
- Complete the steps for Accessing Nexus Repo
11.2.2. EUI (Engineering User Interface)
The EUI controls the TMA. It can determine if the EUI itself is in control, if the CSC is in control, or if the Hand Held Device is in control.
- Pull the Docker container docker pull ts-dockerhub.lsst.org/tma_software:develop
- Run the Docker container using the proper arguments to run the Windows X server. Mine for example is docker run -it -e DISPLAY=$IP:0 -v /tmp/.x11-unix:/tmp/.x11-unix -v /Users/aheyer/gitdir/:/home/saluser/gitdir andrewheyer/tma_software:develop
- Do labview64
- When asked to “Select files to recover” deselect all and Discard.
- Open the LSST_HMIs.lvproj file. It should already be listed under “All Recent Files”
- When asked to find “FGV_BasicFGVAction.ctl” open the drop down selection from the top. The last item from this drop down menu will have a path ending with “/_controles”, open this path. You will see the FGV_BasicFGVAction.ctl file here. Double click it.
- Ignore the “Load Warning Summary” Dialogue.
- The Labview project should now be open, expand “Main” and double click “HMIMain_EUI.VI”
- A “Resolve Load Conflict” window will appear, double click the middle option. This option also is the only one that has a “14.0” string under “LabVIEW Version”. Double click this option.
- Ignore the “Load Warning Summary” Dialogue.
- Click the run arrow.
- Login user=MUser pw=1234
- Once logged in we have demonstrated that the EUI is able to communicate to the NSV’s. The most simplistic way to generate NSV’s is by running the NSV Simulator on a Windows 10 Machine.